
Science exhibition ideas that teachers can build in a day are low-cost, hands-on projects using everyday materials that demonstrate real scientific principles. You can create working models, experiments and displays in 6 to 8 hours using items from your school storeroom or local market. This article covers five practical science exhibition projects, materials lists, step-by-step instructions, and tips to help your students present them confidently.
What are one-day science exhibition projects and why do they matter?
One-day science exhibition projects are low-cost, hands-on demonstrations that students and teachers can build together in a single school day using everyday materials. They fit the reality of Indian school schedules because time is limited, budgets are tight, and students juggle multiple subjects. Quick projects build student confidence, reduce stress, and still meet curriculum goals. They also align with CBSE science exhibition guidelines, which value clarity and practical understanding over elaborate setups.
When students build projects themselves, they learn more than from watching a demonstration. They troubleshoot, ask questions, and own the learning. One-day timelines also make science exhibitions inclusive, students from all economic backgrounds can participate without expensive materials or months of preparation.
How do you build a water purification filter in 45 minutes?
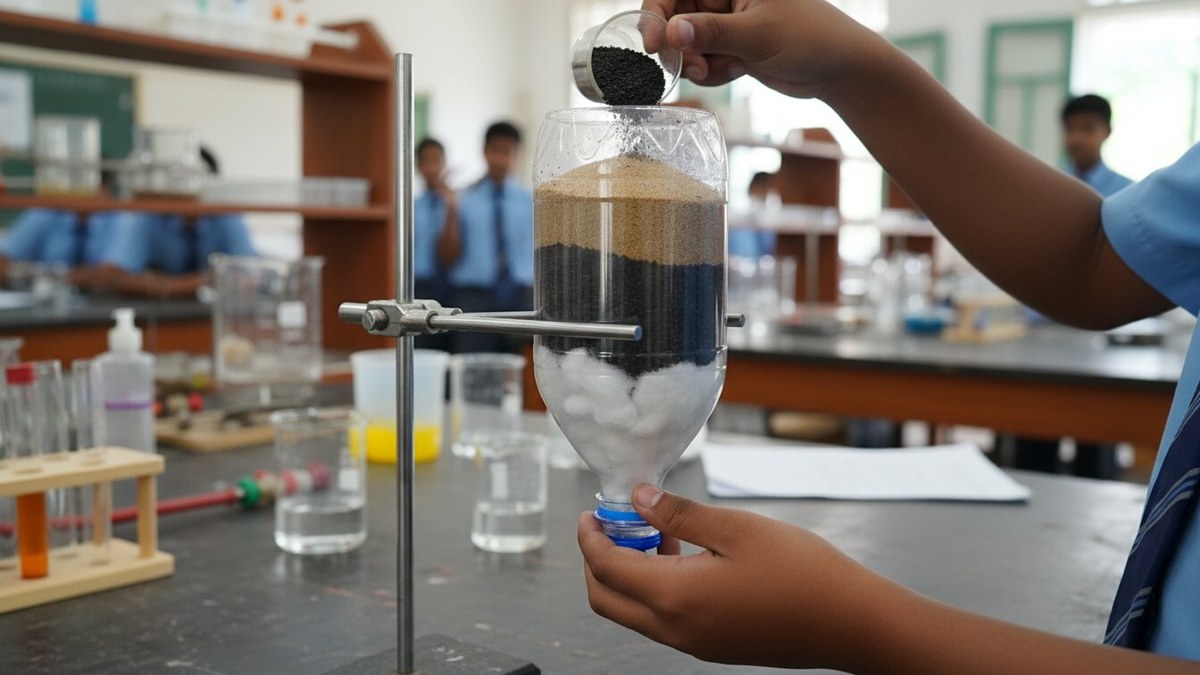
A water purification filter is a practical project that shows how filtration works and takes about 45 minutes to build and test. It teaches students about water treatment, a key environmental science topic.
Materials: Two plastic bottles (1.5 L), sand, gravel, activated charcoal (from any pharmacy), cotton wool, dirty water (mix soil and water), a knife, and a marker.
Steps:
- Cut the bottom off the first bottle and invert it into the second bottle (like a funnel).
- Layer the filter from bottom to top: cotton wool, activated charcoal, sand, gravel, cotton wool.
- Pour dirty water through the top layer and watch it filter down.
- Collect the cleaner water at the bottom and compare it with the original.
- Label each layer and explain how each one traps particles.
Exhibition tip: Bring three water samples, dirty, filtered, and boiled, to show the difference between filtration and purification. Students can predict which will be clearest before testing.
How can you demonstrate a chemical reaction with a volcano eruption?
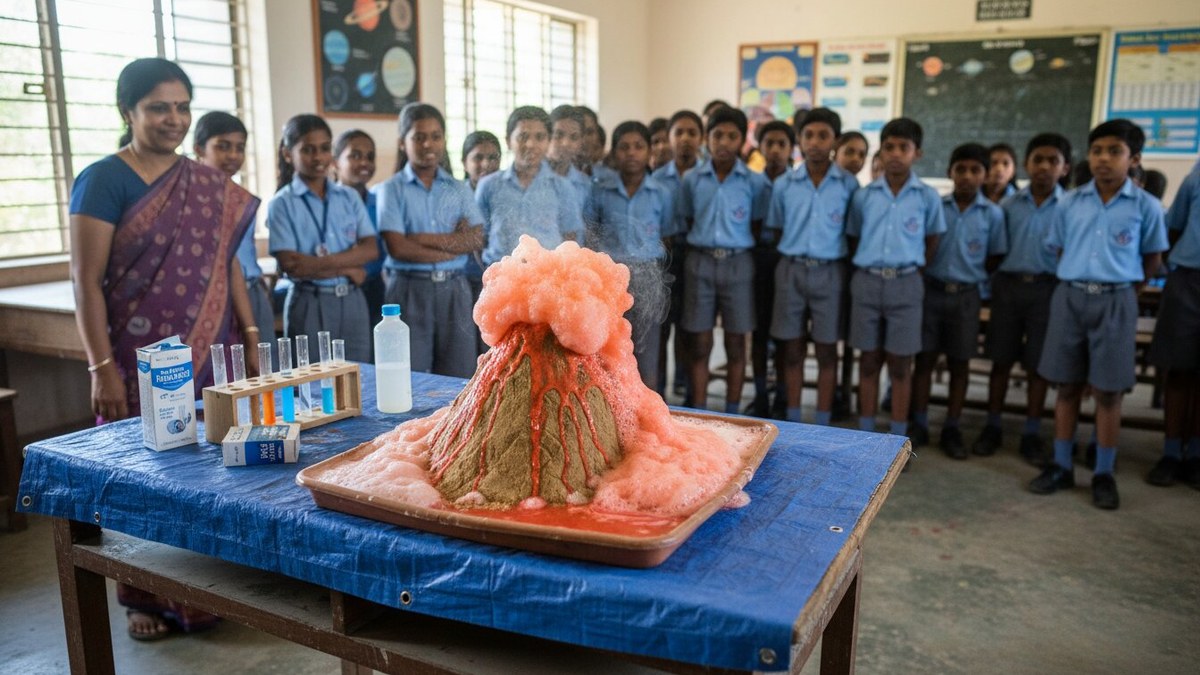
A volcano eruption is a classic project that demonstrates acid-base chemical reactions and takes about 30 minutes to build. It captures attention and makes chemistry memorable for visitors.
Materials: Plastic bottle, baking soda, vinegar, food colouring, dish soap, sand, a tray, and a marker.
Steps:
- Build a cone around the bottle using sand or clay on a tray.
- Fill the bottle halfway with vinegar and add 5 drops of food colouring and a squirt of dish soap.
- Place a spoon of baking soda into the bottle mouth and step back.
- The mixture will foam and overflow like lava.
- Explain the acid-base reaction on your display card.
Exhibition tip: Perform the eruption live during the exhibition. Students love the reaction, and it makes the chemistry memorable. Have extra vinegar and baking soda ready for repeat demonstrations.
How do you build a working electromagnet?
An electromagnet teaches magnetism and electricity together and takes about 1 hour to assemble and test. Students see how electricity creates a magnetic field, a core physics concept.
Materials: An iron nail (3 to 4 inches), copper wire (1 mm), a battery (9V or AA), a switch (or just strip the wire), iron filings or small nails, and tape.
Steps:
- Wrap copper wire tightly around the nail 20 to 30 times, leaving 2 inches free at each end.
- Connect one end to the positive terminal of the battery and the other to the negative (or through a switch).
- Test by bringing iron filings near the nail, they will stick when current flows.
- Turn off the switch and they fall off.
- Count how many filings stick with different wire wraps or battery types.
Exhibition tip: Show how electromagnets are used in doorbells, cranes, and MRI machines. This connects abstract physics to real life and keeps students engaged. If your school has access to AI in classroom teaching platforms, students can research real-world applications before the exhibition.
How can you compare plant growth in different soil types?
Plant growth in different soils teaches soil science and plant biology. The setup takes only 30 minutes, but results show over 5 to 7 days, making it ideal for schools that start preparation a week before the exhibition.
Materials: Three identical pots, three soil types (clay, sand, garden soil), seeds (beans or mung), water, labels, and a ruler.
Steps:
- Fill each pot with a different soil type.
- Plant three seeds in each pot at the same depth.
- Water each pot equally every day.
- Measure seedling height daily and record in a table.
- Present results as a bar graph showing which soil grew the tallest plant.
Exhibition tip: If time is very short, start seeds 3 to 4 days before the exhibition so they germinate and show visible growth. Bring photos or a time-lapse video if live plants are not ready. Use student research guides to help students find information about soil composition and plant nutrition.
How do you build a simple circuit with LEDs?
A simple circuit with LEDs introduces electricity and circuit design and takes about 45 minutes to build a working demonstration. Students learn how electricity flows and how switches control circuits.
Materials: A battery (AA or 9V), LED bulbs, copper wire, a switch, a cardboard base, and tape.
Steps:
- Draw a circuit diagram on the cardboard base.
- Connect the battery positive terminal to one side of the switch using wire.
- Connect the other side of the switch to the LED positive leg (longer leg).
- Connect the LED negative leg back to the battery negative terminal.
- Flip the switch, the LED lights up.
- Add more LEDs in series or parallel to show different configurations.
Exhibition tip: Explain series vs. parallel circuits with a poster. If you have access to APNA PC, you can use Scratch to simulate circuits before building them physically, helping students understand the concept first. You can also create educational songs with AI to help students remember circuit rules.
What materials should you use and where can you find them?
Most one-day projects use materials already in school or home. Plastic bottles, old wire, batteries, and sand cost very little. Visit your local market, hardware shops sell copper wire at affordable rates, and pharmacies stock activated charcoal. Ask parents to donate used bottles or containers. Many government schools have storerooms with old equipment that can be repurposed.
If your school has digital tools, students can research materials online and find cheaper suppliers. They can also use AI voice tools for teaching to record explanations about material sourcing in Hindi or your local language, making the project more inclusive.
What tips help make exhibition day successful?
Prepare a clear display card for each project with the aim, materials, steps, and results. Use simple language and include diagrams. Practice the demonstration once before the exhibition so you know what will happen and can troubleshoot any issues.
Assign one student per project to be the “explainer.” They should be able to answer basic questions like “Why did it work?” and “What would happen if we changed this?” Dress the table neatly with a cloth, arrange materials logically, and keep the background uncluttered so judges and visitors focus on the project.
Bring extra materials in case something breaks or runs out. Have a notebook handy to record visitor feedback and student observations. Take photos during setup and demonstrations, these help document learning and can be shared with parents. Check your school’s curriculum to match projects with topics students are studying. Water filtration fits environmental science, electromagnets align with physics, and plant growth connects to biology. This ensures the exhibition reinforces classroom learning.
Many schools participate in science fairs recognized by the Department of Science and Technology, including the INSPIRE awards scheme. One-day projects can be stepping stones, students who enjoy them may develop more complex projects for these competitions later.
Frequently Asked Questions
Can I prepare these projects with students who have no science background?
Yes. Each project uses everyday materials and simple steps. Read the instructions aloud, demonstrate once, then let students build. Ask questions like “What do you think will happen?” to guide thinking. Mistakes are learning opportunities, if something doesn’t work, troubleshoot together.
How much will these projects cost?
Most projects use inexpensive materials found at home or school. Water filtration and volcano eruptions use common household items. Electromagnets and circuits require wire and batteries, which are affordable at local hardware shops. Plant growth projects are nearly free if you use school garden soil and seeds. Reuse materials across multiple groups to save money.
What if I don’t have time to prepare before the exhibition?
Choose the volcano or water filter, both take under 1 hour to set up. You can also ask students to build projects at home with parent help over 2 to 3 days, then assemble displays the evening before. Provide a written guide so families know exactly what to do.
How do I make the exhibition engaging for visitors?
Let students perform demonstrations live, the volcano eruption and electromagnet test are crowd-pleasers. Ask visitors to predict outcomes before the experiment. Provide a simple quiz or worksheet so younger students stay engaged. Use bright posters and label everything clearly.
Can I use digital tools to enhance these projects?
Absolutely. Use Scratch (pre-loaded on APNA PC) to simulate circuits before building them. Create digital presentations or videos showing the project steps. Record explanations using AI voice tools. These additions make projects richer and help students who learn better with visuals and audio.
Science exhibitions don’t need to be complicated or expensive. One-day projects prove that great learning happens with creativity, curiosity, and a few simple materials. Start with one project this week, involve your students, and watch their confidence grow. Explore how APNA PC can power your school science projects with pre-loaded tools like Scratch, LibreCAD, and Blender to take demonstrations even further.